DIY Rustic Inexpensive WeddingInvitations

I’ve been trying to plan and DIY my entire wedding, which in the end had been one of the best ways to save my bank account! It seems like everything with a wedding is expensive! But I was able to print off approximately 100 wedding invitations with decorations and envelopes for $65!

For starters I decided to look on Etsy to purchase a template for the wedding invites. I was able to find a simple, no color or intricate invitation template that cost $7.00. After purchasing the template and having the PDF file emailed to me, I filled out my information for the wedding and brought the copies in a usb drive to a local FedEx where they were able to print them off on a off white antique cardstock for about $37!

I decided to pay the extra money to have them Lazer cut the sheets out, it saves your hands and your sanity! But the total cost for them to cut out my invitations was $14.

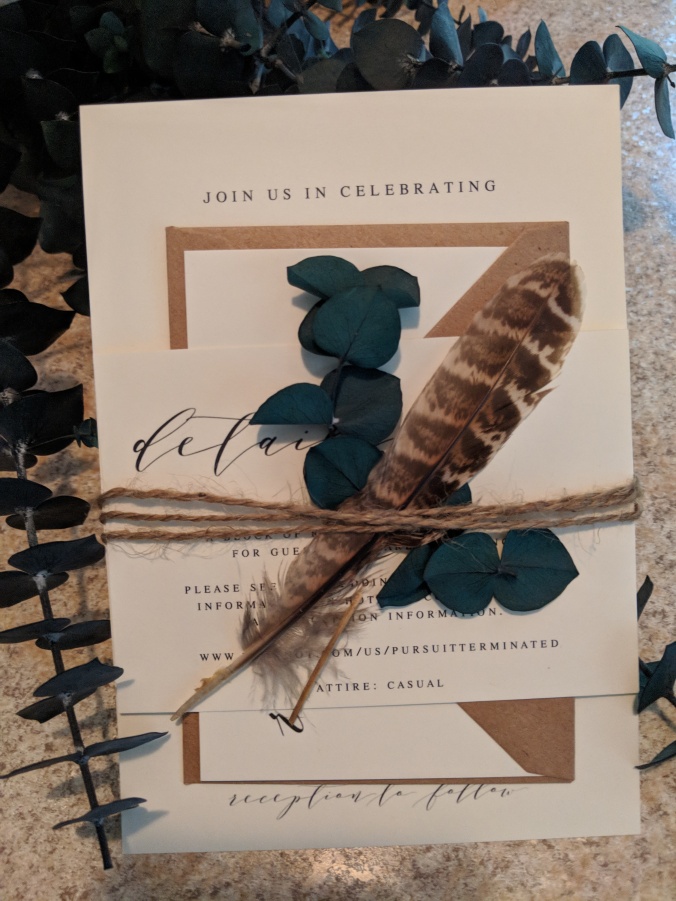
After having the individual pieces of my invitations, including the main invite, a RSVP card and the details page. On Amazon I was able to purchase 100 small A1 brown paper envelopes for $7.99 and the normal larger sized envelopes for $12.99 on Amazon. Before putting them together I also ordered some small pheasant feathers from wish (they did actually come!) And some preserved eucalyptus from hobby lobby, and a small thing of twine that I already had.

After stacking the cards together how I liked them I wrapped the twine around the cards several times and tucked a feather and a small piece of eucalyptus under it.

Diy rustic wedding invitations with eucalyptus and feathers inexpensive

After this I used a stamp that had mine and my fiance’s name and address to hand stamp the envelopes and return RSVP envelope. This definitely saves your hand from the pains of hand writing 200+ invitations!

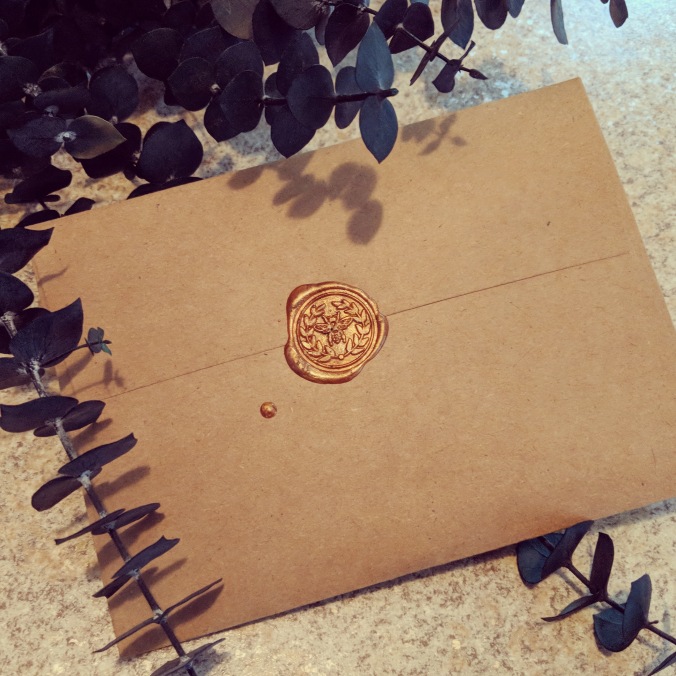
After putting the invites in the envelopes I used a wax seal and sealing sticks that I purchased off amazon (I know I have a problem!)

Diy wedding invitations rustic eucalyptus and feather

Once signed and sealed and stamped they were ready to go out. Now be aware that adding the feather and yarn and eucalyptus does add enough weight that you’ll need to buy a more expensive stamp, my stamps cost me almost $90 for the initial stamp and RSVP return envelope stamp!!! These invitations will also have to be hand stamped and cannot go through the machines at the post office without potentially crushing the contents and seal.

Overall, save the money and design your own invitations!

Steel Drum into a Farmhouse Trash Can

Over the last two years I have been trying to figure out some way to make a trash can fir in better with the decor of our house. The silver flip top trash cans I always felt were too modern, I knew we would have to recycle something and make it into exactly what we were looking for.

My fiance was able to source a 30 gallon steel drum from a friend for free. Now this drum had been used for some sort industrial floor polishing chemical, so I knew it needed time to air out and clean it.

My fiance got to work using a cut off wheel to cut off the top of the drum and we used bleach and a pressure washer to clean the inside of the drum. After it was sufficiently scrubbed and dried I used Rust-Oleum spray paint in a navy blue color to give the drum a few coats of paint.

Now because we have a two year old son and a giant German Shepherd we knew we would need a lid. We found a perfect handle at hobby lobby, and traced the bottom of the drum on a piece of plywood to cut out a piece that would fit inside the lid and act as a stop so the lid can’t be just pushed or slid off. After that we lined up multiple pallet boards and cut out a circle to screw on to the smaller plywood circle we had made. (I forgot to take pictures of this step!) After the plywood and pallet boards were screwed together to make the lid and the handle attached I used a spray paint top coat to seal the under side of the wood.

After the lid was created I used a small section of rubber tubing and slice it down the middle and used E6000 glue to glue it over the edge of the top of the trash can to prevent it from being too sharp!

Steel drum trash can farmhouse decor trashcan upgrade

To finish it off I purchased a white decal from an Etsy site called RoseandRust,

Here is the link to her shop!

https://etsy.me/2Ap5dwN

After applying the decal and a garbage bag the look was complete and I couldn’t be happier with our new trash can!

Secretary Hutch refurbish and upcycle

I’ve always admired my grandmas secretary hutch/curio cabinet. Finally I found one that fit a perfect spot under our stairs!

Secretary hutch curio cabinet antique refurbished upgrade

I found this gem on facebooks marketplace for $150. It appeared that it was already sanded down from a Robbins egg blue color, which meant that half of the work of prepping the wood was already done!

I lightly sanded with a fine furniture sand paper and could jump right in to paint and stain. I went back and forth between a flat black, French blue or ivory color. I sides with the French blue, not quite black but very different from the ivory I’ve done in my latest pieces. The paint I used was Benjamin Moore in Midnight Blue and the stain was Rustoleum in Kona.

Before I start I always try to picture which pieces I want to be painted and stained, usually I try to have anything that is stained either be the top or a table like surface or have it surrounded on all four sides by the paint color I have picked. I think this gives the piece balance and helps to highlight specific areas.

After painting the areas I wanted painted I applied the stain and decided to paint the inside bottom cabinet and stain the inside of the secretary area. I also stained the inside of the curio cabinet. The only thing I dislike is how dark the stain made the inside of the cabinet, but nothing that a small light couldn’t fix!

Antique secretary hutch curio cabinet makeover refurbish

The secretary cubby storage piece was separate from the inside of the hutch so I decided to attach it to the top of cabinet with several small finishing nails, now my laptop fits perfectly in the cabinet.

Now there is just more room to fit more antiques and junk!

Vintage Makeup Vanity Table Upgrade

My grandparents frequently drop off furniture or odds and ends that they no longer want or project pieces that they think I would have fun with. This horribly worn down vanity with the mirror was one of these items.

Vintage dresser makeup vanity remodel and upgrade

In the beginning it needed a lot of work! I removed the mirror which came off easily and took to using a furniture grade sandpaper to start taking off the layers or old paint that was giving this vanity a very rough texture. I sanded everything including the top wooden part, and this took a lot of time. Sometimes redoing furniture can be such a tedious task, especially when it comes to sanding because it is setting up the foundation of how good your piece will look!

After all that sanding (and there was a lot of it!) I decided why not sand a little more. I found this old chair for $3.00 at a local antique shop and brought it home. It was the perfect height for the vanity! I began by sanding the piece down and priming it before painting it white and using an old grain sack to reupholster the cushion.

Vintage makeup vanity dresser table remodel and upgrade

Unfortunately all I have left of this project are the finished product pictures. But after sanding the piece down and finishing the chair I painted the piece in a soft mossy pastel green color, that could almost be mistaken for off white, and painting the mirror in soft cream color. After the paining was finished I went back in and stained the top of the vanity with a dark stain and clear coated the top. I switched out the knobs for some I had found at Hobby Lobby and reattached the mirror.

And there you have it, a simple country vanity that can be completed in a weekend!

Christmas Eve… On The Road Patrol

Being in a career that has to provide 24 hour service means that quite often you have to work holidays and special events, Christmas Eve and day are no different.

This will be my fourth year in a row working Christmas Eve, and without fail I always learn something from this night. Too often as a police officer you are stuck between your off duty life, and your uniformed life. Christmas is a perfect example of that. Living in the county that I work for I am able to stop by my home for dinner with my significant other and enjoy some family time away from my cruiser. However, while I may be enjoying a meal with family, I am still listening to the radio and wearing a gun belt. Too often the joy and excitement of the holidays is always closely stalked by a shadow of misfortune and bad luck that could be seconds away.

I’ve worked Fatal accidents and deaths in families, bad car accidents and seen homes burn, been to calls where families fight and woman left beaten and bruised by their boyfriends. The holidays can be a magical time of the year, but this job has taught me that life and tragedy don’t stop just because it’s December 25th.

Many police officers know the struggle of putting on a vest and uniform and facing the worst moments of people’s lives, then going home to take it off and immerse themselves back into their family lives. However, the weight of these calls and experiences can not be taken off.

As much as the holiday is about joy and gifts and celebration, it is also a double edged sword that makes any unfortunate call that much harder.

So hug your families and say that extra I love you, enjoy time together and feel the magic that these holidays bring. Take time to appreciate what you have, material and non material. I know that these holidays always make me appreciate what I have that much more. Taking the time to do the little things like wearing Christmas socks makes working the holiday a little more magical.

Bathroom Burlap Rustic Christmas Tree

I grew up in a household where every room had a Christmas tree… even the bathrooms. So by wanting to carry on that tradition I decided to put a gifted Christmas tree in the bathroom and wanted to decorate it with burlap and homey items that you would find in the kitchen and laundry room.

So by adding a burlap bow that I bought at hobby lobby for 50% off and wrapping the tree in burlap ribbon that I had bought at the dollar store I thought I was off to a good start.

Next I created some ornaments by taking apart clothespins and gluing them flat sides together and organizing them into the shape of a Star. The second ornament is Walmart brand mason jar lids that you can get fairly cheap. I added some leftover burlap I had on hand and added a bundle dried lavender. You could really almost add anything to the middle and use the mason jar lid as a background!

DIY burlap Christmas ornaments

I also added some burlap ribbons that I had found at hobby lobby, it’s seriously the best place to get your Christmas decorations!

Lastly I used some clear plastic ball ornaments I had gotten from the dollar store and used that same burlap to wrap them and gather the material at the top of the ornament and hot glue it in place, adding some green floss wrapped around the top as well, just to make it appeared tied there.

Burlap farmhouse Christmas trees

As simple as it is, I think it adds a good mix of simplicity and elegance. Only six more trees to go!

Coffee Bomb Bar out of Old Ammo Crate

Every now and then you find something at a shop that you don’t really know what you’re going to use that item for, but you buy it and hold on to it. That was the case with this ammo crate. I had carried it around with me, from house to apartment and left it alone, until I bought my house a year ago and found the best place to put it.

It’s slowly evolved into what it is now, but for starters we had tried to install old table legs to it and try to get it to stand on its own, however, the legs didn’t look right and the table was unstable.

So the table legs came off and we decided to attempt to create a floating “Bomb bar” for our Keurig. We started by taking off the top and using a drill to make pilot holes through the back of the crate.

Next, using long screws we drilled those into the studs of the wall and added two decorative brackets underneath the box to help support it a little more.

To help the Keurig fit into the box and slide up against the wall we used a drill again to drill out an area into the box, below the lid, so that the cord would fit into the box and drilled a hole through the bottom of the box so it could come out the bottom and plug in. Now because I thought having a cord hanging out of the bottom would not be very attractive, I wrapped the chord with hemp rope and hot glued it in various places to help it stay put.

Later, deciding that I wanted to use the lid of the crate to hang a rake head that I had found to hand coffee cups from, I was left trying to decide what I wanted to use as a lid. We decided to use glass that was cut to size and to fill the crate with straw and whiskey bottles.

Using wood plugs I drilled a small hole that would fit the plugs and used wood glue to hold them in place.

The wooden plugs I used like this,

After many years of carrying around the now coffee bar it was definitely worth the hassle!

The Difference One Year Can Make… An Adventure Into Homeownership

What a whirlwind the last year has been. On December 8th, 2016 I made the biggest purchase of my life to date, my home. Sometime in October I decided to stop in at a mortgage company I had passed everyday for months and see if I was ready to purchase a home, or what I needed to do to get ready. While apartment life wasn’t horrible, I was ready for the freedom that home ownership would bring. I stopped in on a whim, and walked out with a pre-approval letter and contacted a real estate agent that I had been referred to that day.

I already had a house in mind… One that I had driven past daily at work and had fallen in love with before even seeing the inside. Later that month, I was able to get a showing at the house of my dreams, and then saw three other houses that just fell flat compared to the blue beauty that had caught my eye. So, I made an offer, and within in a day it was accepted. Fast forward a month and a half and I was unlocking the doors to my new home, with my new companion, Jasper.

Now, on December 8th, 2017 I am much more settled into the house, and looking back at photographs from the day I moved in, to today, the change is drastic!

Farmhouse kitchen makeover

The entire house got a fresh coat of paint and over the last year the walls have been filled with oddities and antiques that I have found on my treasure hunts. One of the most important changes and additions to my home though, is changing it from “my home” to “our home” after meeting the love of my life who has assisted and helped me with all of my many projects in turning this house into what it is today.

A year can bring so many changes, and growth. This last year has been one of the best I can remember and the love that I felt I think is clearly visible in our home. Through many ups and downs and even near carbon monoxide poisoning, and plumbing leaks, we have weathered it all and made our home, ourselves and our relationship stronger.

Bathroom subway tile with dark grout

My advice to new homeowners, or potential buyers, be brave and don’t stress too much (I know I need to take that advice myself!). Get your hands dirty and do things yourself, learn new skills (like tiling and word working!), and don’t be afraid to mess up, dry wall and paint can be fixed and changed. Let your house become a reflection of you, and learn from each obstacle and victory.

Farmhouse kitchen cabinet makeover

This first year has been amazing and I cannot wait to see what 2018 has to bring.

DIY refinished Lane cedar chest

Sometimes a deal that’s too good to pass up just happens to stop right in front of you. In my case that was this Lane Cedar Chest. Even with the water damage and missing woodwork on one of the legs, for $10.00 I knew this piece would and could be something truly beautiful.

Like all of my projects, I started by stripping it down to its bare bones. In the case of this Cedar Chest that meant taking off the handles and the secret decorative drawer at the bottom, then using an electric sander to sand the top of the chest. I attempted to remove as much of the water damage as I could, however, I was unable to get all of it. I like to think it can add to the charm!Lane cedar chest refurbished

After breaking the piece down and filling in the holes from where the handles used to be, I gave the entire thing a good sanding and wipe down with a wet cloth and moved on to reinforcing any loose or unstable parts with wood glue and clamps.

After the piece was reinforced and cleaned up it is time to move on to painting. Seeing that I had a theme going of white furniture with dark stained wood tops I wanted to keep this look going with this Cedar Chest.

This piece took three coats of a flat off-white paint and I stained the top a dark color in an attempt to hide the still visible water damage. Instead of finishing it off with a glossy top coat I went for a satin finish which I think works better with the rustic nature of my home. Luckily the inside of the chest was perfect and only needed some Cedar chips to bring back the smell.

Refurbished lane cedar chest diy

I decided against adding handles back to the front of the chest, and added a new layer of red felt to the drawers with fabric glue.

This is just another example of what a little TLC can do for an outcast diamond in the rough.

Refinished Vintage Dresser DIY

After purchasing my first house a year ago I quickly realized that I was lacking furniture and my home was rather empty! Instead of spending hundreds of dollars that I didn’t have on brand new furniture, I decided to be frugal and green by buying second hand and vintage furniture at local shops and repurpose and refinish them myself. I found that as daunting a task as it may seem, it is way easier than I ever thought it would be and that once you begin to collect the necessary items to refinish furniture like sand paper and paint, it gets cheaper and cheaper to refinish each item.

One of the items I needed badly was a dresser! I found one at a local Amish owned second hand shop for $70, and spent approximately $15 in wood appliqués to help spruce it up a bit. The other items I found laying around my house and had purchased for previous projects.

While maybe not the prettiest piece of furniture initially, I fell in love with the rounded front feet.

To start the piece I stripped it down, gave it a good sanding with a medium grit furniture grade sand paper and wiped it down with a damp cloth. Then I added the wooden appliqués for a decoration with wood glue and clamped them on for 24 hours to ensure that they had dried.

I did the same with the appliqués and sanding to the drawers.

Dresser upgrade diy

After painting the body of the dresser and the drawers with two coats of a white flat paint, and staining the top with rustoleum wood stain in Cherry and clear coating the top it was time to replace the handles and reinsert the drawers. The handles I purchased at Hobby Lobby for 50% off!

Farmhouse dresser diyDIY French country dresser

I think that the finished project turned out great and looks like a much more modern piece of furniture that cost way more than $85!

On to the next one! Stay tuned for more reviews, hauls, DIY’s and overall miscellany!